Ansible guide : https://docs.ansible.com/ansible/devel/scenario_guides/guide_aci.html
I create a docker container with ansible, python and the demo from github.
git clone https://github.com/CiscoDevNet/aci-learning-labs-code-samples
cd aci-learning-labs-code-samples
docker image with ansible and python:
docker pull zednetwork/aci-ansible2-4
New version with ansible 2.8.2 using debian 10.
docker pull zednetwork/aci-ansible.2-8-2
Docker Compose example:
version: "3"
services:
  ansible:
    image: zednetwork/aci-ansible2-4
    tty: true
    stdin_open: true
Start the container and connect to it:
docker-compose up -d
Creating network "aci-ansible_default" with the default driver

Pulling ansible (zednetwork/aci-ansible2-4:)…

latest: Pulling from zednetwork/aci-ansible2-4

22dbe790f715: Downloading [>                                                  ]  465.6kB/45.34 MBf88405a685: Pulling fs layer

22dbe790f715: Downloading [=>                                                 <..>
22dbe790f715: Pull complete
3bf88405a685: Pull complete
Creating aci-ansible_ansible_1 … done
Check container
# docker images
 REPOSITORY                  TAG                 IMAGE ID            CREATED             SIZE
 zednetwork/aci-ansible2-4   latest              ff17ed37f691        34 minutes ago      659MB

# docker ps
 CONTAINER ID        IMAGE                       COMMAND             CREATED              STATUS              PORTS               NAMES
 53993071ffa9        zednetwork/aci-ansible2-4   "bash"              About a minute ago   Up About a minute                       aci-ansible_ansible_1
Connect to the container. Use the Container ID above.
# docker exec -it 53993071ffa9 /bin/bash
root@53993071ffa9:/#
This container already contains an example from devnet.cisco.com ( https://developer.cisco.com/docs/aci/#ansible). This example uses a public ACI Fabric.
We can use the first playbook to create a tenant on the ACI Fabric. The fabric credential is on the inventory file.
root@53993071ffa9:~/aci_ansible_learning_labs_code_samples/intro_module# cat inventory
 [apic:vars]
 username=admin
 password=ciscopsdt
 ansible_python_interpreter="/usr/bin/env python"
 [apic]
 sandboxapicdc.cisco.com
You can connect directly to the fabric and verify if your tenant is present. https://sandboxapicdc.cisco.com/
root@53993071ffa9:~/aci_ansible_learning_labs_code_samples/intro_module# ansible-playbook -i inventory 01_aci_tenant_pb.yml
 What would you like to name your Tenant?: MyFirstTenant-tn
 PLAY [ENSURE APPLICATION CONFIGURATION EXISTS]
 TASK [ENSURE APPLICATIONS TENANT EXISTS]
 changed: [sandboxapicdc.cisco.com]
 PLAY RECAP
 sandboxapicdc.cisco.com    : ok=1    changed=1    unreachable=0    failed=0
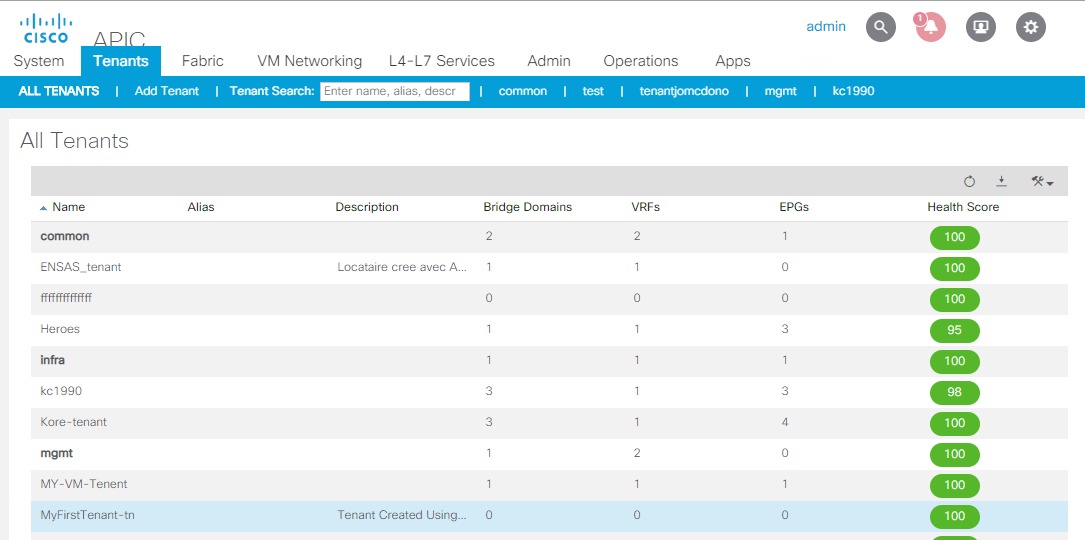
Go to ACI > Tenants
You can delete your tenant with another playbook
root@53993071ffa9:~/aci_ansible_learning_labs_code_samples/intro_module# ansible-playbook -i inventory 01-1_aci_tenant_pb.yml
 What would you like to name your Tenant?: MyFirstTenant-tn
 PLAY [ENSURE APPLICATION CONFIGURATION EXISTS]
 TASK [ENSURE APPLICATIONS TENANT EXISTS]
 changed: [sandboxapicdc.cisco.com]
 PLAY RECAP
 sandboxapicdc.cisco.com    : ok=1    changed=1    unreachable=0    failed=0
Other example to list all tenants:
# cat listTenants.yml
---
- name: ENSURE APPLICATION CONFIGURATION EXISTS
  hosts: apic
  connection: local
  gather_facts: False

  tasks:

    - name: List all tenants
        aci_tenant:
        host: "{{ ansible_host }}"
        username: "{{ username }}"
        password: "{{ password }}"
        state: "query"
      validate_certs: False

# ansible-playbook -i inventory listTenants.yml -vvv