root@c86d023821ff:~# ansible-playbook ucs_vlan.yml -i inv_ucs
PLAY [ENSURE APPLICATION CONFIGURATION EXISTS] *
TASK [Configure VLAN] **
[WARNING]: Platform linux on host 10.0.100.162 is using the discovered Python interpreter at /usr/bin/python, but
future installation of another Python interpreter could change this. See
https://docs.ansible.com/ansible/2.9/reference_appendices/interpreter_discovery.html for more information.
changed: [10.0.100.162]
PLAY RECAP *
10.0.100.162 : ok=1 changed=1 unreachable=0 failed=0 skipped=0 rescued=0 ignored=0
Now your vlan ID 11 is available on the UCS Fabric Interconnect.
You can use the module ansible ucs_vlan_find to get all vlans:
You can search all commands ucs and the documentation with the following commands:
PS C:\WINDOWS\system32> Get-Command -noun Ucs | more
CommandType Name Version Source
----------- ---- ------- ------
Alias Acknowledge-UcsBlade 2.5.3.0 Cisco.UcsManager
Alias Acknowledge-UcsChassis 2.5.3.0 Cisco.UcsManager
Alias Acknowledge-UcsFault 2.5.3.0 Cisco.UcsManager
Alias Acknowledge-UcsFex 2.5.3.0 Cisco.UcsManager
Alias Acknowledge-UcsRackUnit 2.5.3.0 Cisco.UcsManager
Alias Acknowledge-UcsServerUnit 2.5.3.0 Cisco.UcsManager
Alias Acknowledge-UcsSlot 2.5.3.0 Cisco.UcsManager
Alias Add-UcsMo 2.5.3.0 Cisco.UcsManager
Alias Associate-UcsServiceProfile 2.5.3.0 Cisco.UcsManager
Alias Compare-UcsMo 2.5.3.0 Cisco.UcsManager
Alias Decommission-UcsBlade 2.5.3.0 Cisco.UcsManager
Alias Decommission-UcsChassis 2.5.3.0 Cisco.UcsManager
Alias Decommission-UcsFex 2.5.3.0 Cisco.UcsManager
Alias Decommission-UcsRackUnit 2.5.3.0 Cisco.UcsManager
Alias Decommission-UcsServerUnit 2.5.3.0 Cisco.UcsManager
Alias Disable-UcsDiskLocatorLed 2.5.3.0 Cisco.UcsManager
Alias Disassociate-UcsServiceProfile 2.5.3.0 Cisco.UcsManager
Alias Enable-UcsDiskLocatorLed 2.5.3.0 Cisco.UcsManager
Alias Get-UcsCentral 2.5.3.0 Cisco.UcsManager
Alias Get-UcsMo 2.5.3.0 Cisco.UcsManager
Alias Get-UcsOs 2.5.3.0 Cisco.Ucs.Core
[..]

PS C:\WINDOWS\system32> Get-help Get-UcsServer
NOM
Get-UcsServer
RÉSUMÉ
Gets Managed Object of type ComputeBlade, ComputeRackUnit and ComputeServerUnit.
SYNTAXE
Get-UcsServer [-Ucs ] []
DESCRIPTION
Gets Managed Object of type ComputeBlade, ComputeRackUnit and ComputeServerUnit.
LIENS CONNEXES
REMARQUES
Pour consulter les exemples, tapez : "get-help Get-UcsServer -examples".
Pour plus d'informations, tapez : "get-help Get-UcsServer -detailed".
Pour obtenir des informations techniques, tapez : "get-help Get-UcsServer -full".
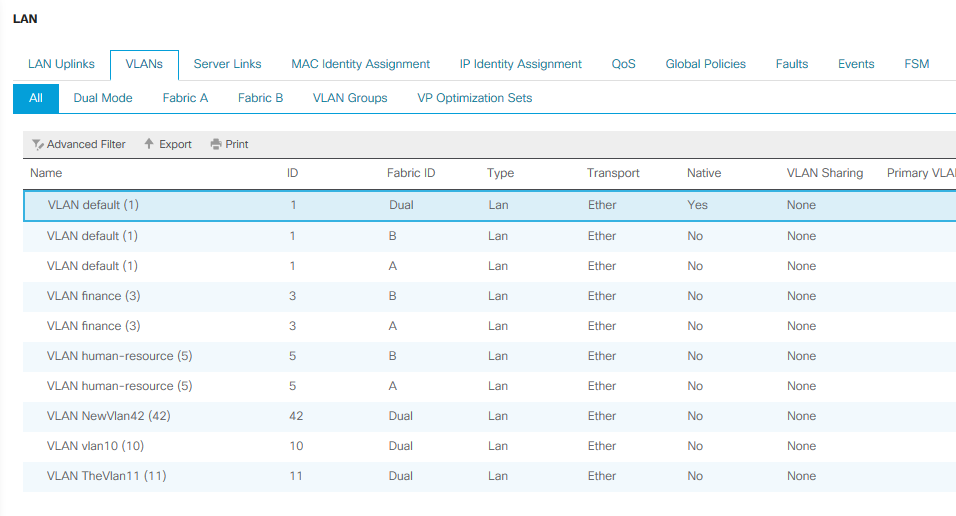
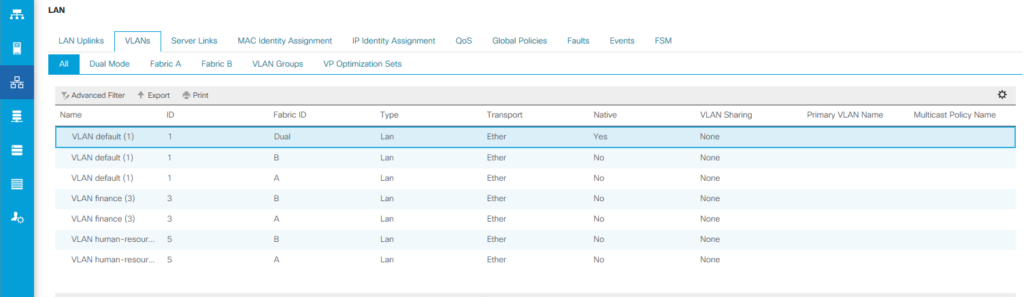
Vlans
Get Vlans
PS C:\WINDOWS\system32> Get-UCsVlan | Select-Object Dn,Name,Id,SwitchId
Dn Name Id SwitchId
-- ---- -- --------
fabric/eth-estc/net-default default 1 dual
fabric/lan/A/net-default default 1 A
fabric/lan/A/net-finance finance 3 A
fabric/lan/A/net-human-resource human-resource 5 A
fabric/lan/B/net-default default 1 B
fabric/lan/B/net-finance finance 3 B
fabric/lan/B/net-human-resource human-resource 5 B
fabric/lan/net-default default 1 dual
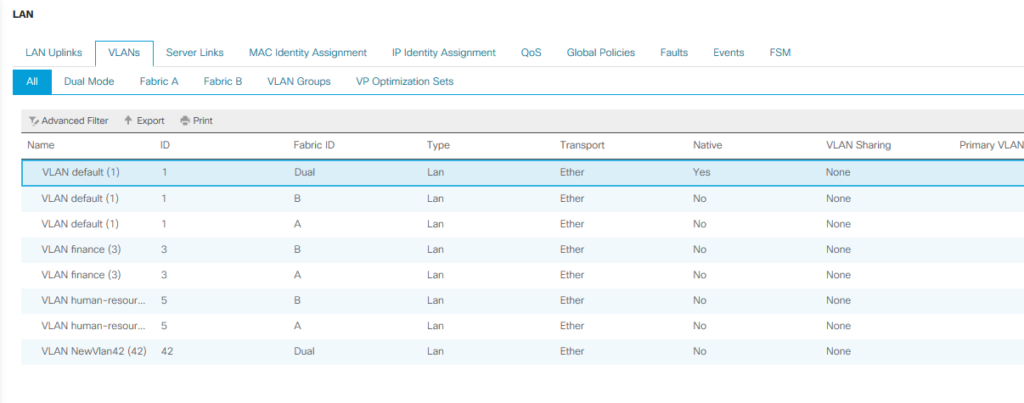
Add Vlans
PS C:\WINDOWS\system32> Get-help Add-UcsVlan
PS C:\WINDOWS\system32> Get-UcsLanCloud | Add-UcsVlan -Name NewVlan42 -Id 42
AssocPrimaryVlanState : ok
AssocPrimaryVlanSwitchId : NONE
Cloud : ethlan
CompressionType : included
ConfigIssues :
ConfigOverlap : ok
DefaultNet : no
EpDn :
Global : 0
Id : 42
IfRole : network
IfType : virtual
Local : 0
Locale : external
McastPolicyName :
Name : NewVlan42
OperMcastPolicyName :
OperState : ok
OverlapStateForA : active
OverlapStateForB : active
PeerDn :
PolicyOwner : local
PubNwDn :
PubNwId : 1
PubNwName :
Sacl :
Sharing : none
SwitchId : dual
Transport : ether
Type : lan
Ucs : UCSPE-10-0-100-162
Dn : fabric/lan/net-NewVlan42
Rn : net-NewVlan42
Status : created
XtraProperty : {}
Verify
PS C:\WINDOWS\system32> Get-UCsVlan | Select-Object Dn,Name,Id,SwitchId
Dn Name Id SwitchId
-- ---- -- --------
fabric/eth-estc/net-default default 1 dual
fabric/lan/A/net-default default 1 A
fabric/lan/A/net-finance finance 3 A
fabric/lan/A/net-human-resource human-resource 5 A
fabric/lan/B/net-default default 1 B
fabric/lan/B/net-finance finance 3 B
fabric/lan/B/net-human-resource human-resource 5 B
fabric/lan/net-default default 1 dual
fabric/lan/net-NewVlan42 NewVlan42 42 dual
In addition to Powershell, you can also use the python SDK (Docs).
Example to add a new vlan:
from ucsmsdk.ucshandle import UcsHandle
from ucsmsdk.mometa.fabric.FabricVlan import FabricVlan
Create a connection handle
handle = UcsHandle("10.0.100.162", "ucspe", "ucspe")
Login to the server
handle.login()
fabric_lan_dn = handle.query_dn("fabric/lan")
newvlan = FabricVlan(parent_mo_or_dn=fabric_lan_dn,
name = "vlan10",
id="10")
handle.add_mo(newvlan)
handle.commit()
Logout from the server
handle.logout()