Example 1
foreach address {
10.0.1.1
10.0.1.2
10.0.1.3
10.0.1.n
} { ping $address
}
Example 2
for {set i 1} {$i < n} {incr i} {
  ping 10.0.1.$i re 1 time 1
}
foreach address {
10.0.1.1
10.0.1.2
10.0.1.3
10.0.1.n
} { ping $address
}
for {set i 1} {$i < n} {incr i} {
ping 10.0.1.$i re 1 time 1
}
crypto isakmp policy 10
 encr aes
 authentication pre-share
 group 2
crypto isakmp key MyKey address 0.0.0.0
!
!
crypto ipsec transform-set TRANS esp-aes
 mode transport
!
crypto ipsec profile PROF_DMVPN
 set transform-set TRANS

interface Tunnel0
 <...>
 tunnel source e0/0
 tunnel mode gre multipoint
 tunnel protection ipsec profile PROF_DMVPN
crypto keyring CCIE vrf VRF1
 pre-shared-key address 0.0.0.0 0.0.0.0 key MyKey
!
!
!
!
crypto isakmp policy 10
 encr aes
 authentication pre-share
 group 2
!
!
crypto ipsec transform-set TRANS esp-aes
 mode transport
!
crypto ipsec profile PROF_DMVPN
 set transform-set TRANS

interface Tunnel0
 <..>
 tunnel source e0/0
 tunnel mode gre multipoint
 tunnel vrf VRF1
 tunnel protection ipsec profile PROF_DMVPN
HUB#
interface Ethernet0/0
ip address 10.0.1.2 255.255.255.0
!
ip route 0.0.0.0 0.0.0.0 10.0.1.1
!
interface Tunnel0
ip address 100.0.0.1 255.255.255.0
no ip redirects
ip mtu 1400
ip nhrp map multicast dynamic
ip nhrp network-id 1234
ip nhrp holdtime 360
ip nhrp redirect
ip tcp adjust-mss 1360
ip ospf network point-to-multipoint
ip ospf 1 area 0
tunnel source Ethernet0/0
tunnel mode gre multipoint
SPOKE1#
 interface Ethernet0/0
 ip address 10.0.2.2 255.255.255.0
 !
 ip route 0.0.0.0 0.0.0.0 10.0.2.1
 !
 interface Tunnel0
 ip address 100.0.0.2 255.255.255.0
 no ip redirects
 ip mtu 1400
 ip nhrp map 100.0.0.1 10.0.1.2
 ip nhrp map multicast 10.0.1.2
 ip nhrp network-id 1234
 ip nhrp holdtime 360
 ip nhrp nhs 100.0.0.1
 ip nhrp shortcut
 ip tcp adjust-mss 1360
 ip ospf network point-to-multipoint
 ip ospf 1 area 0
 tunnel source Ethernet0/0
 tunnel mode gre multipoint

SPOKE2#
 interface Ethernet0/0
 ip address 10.0.3.2 255.255.255.0
 !
 ip route 0.0.0.0 0.0.0.0 10.0.3.1

!
 interface Tunnel0
 ip address 100.0.0.3 255.255.255.0
 no ip redirects
 ip mtu 1400
 ip nhrp map 100.0.0.1 10.0.1.2
 ip nhrp map multicast 10.0.1.2
 ip nhrp network-id 1234
 ip nhrp holdtime 360
 ip nhrp nhs 100.0.0.1
 ip nhrp shortcut
 ip tcp adjust-mss 1360
 ip ospf network point-to-multipoint
 ip ospf 1 area 0
 tunnel source Ethernet0/0
 tunnel mode gre multipoint
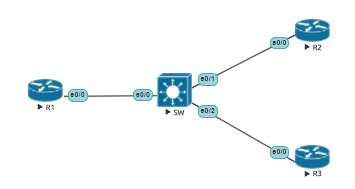
HUB#sh dmvpn
Legend: Attrb --> S - Static, D - Dynamic, I - Incomplete
 N - NATed, L - Local, X - No Socket
 # Ent --> Number of NHRP entries with same NBMA peer
 NHS Status: E --> Expecting Replies, R --> Responding, W --> Waiting
 UpDn Time --> Up or Down Time for a Tunnel
==========================================================================

Interface: Tunnel0, IPv4 NHRP Details
Type:Hub, NHRP Peers:2,

# Ent Peer NBMA Addr Peer Tunnel Add State UpDn Tm Attrb
 ----- --------------- --------------- ----- -------- -----
 1 10.0.2.2 100.0.0.2 UP 01:15:52 D
 1 10.0.3.2 100.0.0.3 UP 01:15:09 D
SPOKE1#sh dmvpn
Legend: Attrb --> S - Static, D - Dynamic, I - Incomplete
 N - NATed, L - Local, X - No Socket
 # Ent --> Number of NHRP entries with same NBMA peer
 NHS Status: E --> Expecting Replies, R --> Responding, W --> Waiting
 UpDn Time --> Up or Down Time for a Tunnel
==========================================================================

Interface: Tunnel0, IPv4 NHRP Details
Type:Spoke, NHRP Peers:1,

# Ent Peer NBMA Addr Peer Tunnel Add State UpDn Tm Attrb
 ----- --------------- --------------- ----- -------- -----
 1 10.0.1.2 100.0.0.1 UP 01:16:18 S


SPOKE1#ping 100.0.0.3
Type escape sequence to abort.
Sending 5, 100-byte ICMP Echos to 100.0.0.3, timeout is 2 seconds:
!!!!!
Success rate is 100 percent (5/5), round-trip min/avg/max = 1/1/2 ms
SPOKE1#sh dmvpn
Legend: Attrb --> S - Static, D - Dynamic, I - Incomplete
N - NATed, L - Local, X - No Socket
# Ent --> Number of NHRP entries with same NBMA peer
NHS Status: E --> Expecting Replies, R --> Responding, W --> Waiting
UpDn Time --> Up or Down Time for a Tunnel
==========================================================================
Interface: Tunnel0, IPv4 NHRP Details
Type:Spoke, NHRP Peers:2,

# Ent Peer NBMA Addr Peer Tunnel Add State UpDn Tm Attrb
----- --------------- --------------- ----- -------- -----
1 10.0.1.2 100.0.0.1 UP 01:16:31 S
1 10.0.3.2 100.0.0.3 UP 00:00:01 D
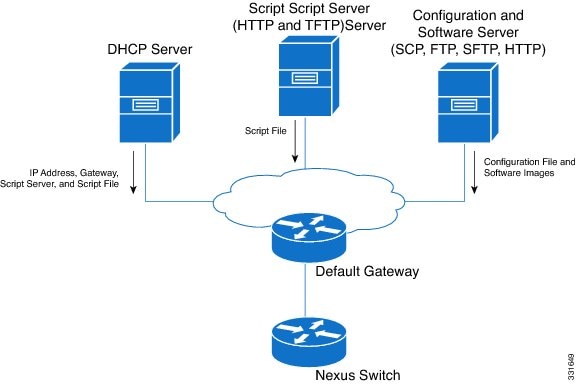
In this article, we will discuss about POAP to provision multiple switches.
We need a DHCP, TFTP and SCP server. We can also use an HTTP server to deliver the software and the configuration.
POAP Infrastructure:
POAP Process:
Software used:
DHCP configuration example :
Subnet used : 192.168.255.0/24
In the following block, I reserve a baud for the Client XXXXXXXX. XXXX is the serial number of the switch.
In the option dhcp-client-identifier you need to add “\000” before the serial number.
We have to assign the following parameter:
In the file: /etc/dhcp/dhcpd.conf
option domain-name-servers 192.168.255.254;

subnet 192.168.255.0 netmask 255.255.255.0 {

host switch1 {
 option dhcp-client-identifier "\000XXXXXXXXXX";
 fixed-address 192.168.255.1;
 option routers 192.168.255.254;
 option bootfile-name "/nxos/poap.py";
 option tftp-server-name "192.168.255.200";
 }

}
TFPT server:
I kept the default configuration, in the file /etc/default/atftpd
USE_INETD=true
 OPTIONS="--tftpd-timeout 300 --retry-timeout 5 --mcast-port 1758 --mcast-addr 239.239.239.0-255 --mcast-ttl 1 --maxthread 100 --verbose=5 /srv/tftp"
In the directory /srv/tftp, I downloaded the poap.py file on github. (https://github.com/datacenter/nexus9000/blob/master/nx-os/poap/poap.py)
This script is provided by Cisco. In this file, you need to customize one part. In the following part you enter the information for:
# system and kickstart images, configuration: location on server (src) and target (dst)
 n9k_image_version       = "7.0.3.I5.2" # this must match your code version
 image_dir_src           = "/srv/tftp/nxos"  # Sample - /Users/bob/poap
 ftp_image_dir_src_root  = image_dir_src
 tftp_image_dir_src_root = image_dir_src
 n9k_system_image_src    = "nxos.%s.bin" % n9k_image_version
 config_file_src         = "/srv/tftp/nxos/conf" # Sample - /Users/bob/poap/conf
 image_dir_dst           = "bootflash:" # directory where n9k image will be stored
 system_image_dst        = n9k_system_image_src
 config_file_dst         = "volatile:poap.cfg"
 md5sum_ext_src          = "md5"
 # Required space on /bootflash (for config and system images)
 required_space          = 800000

# copy protocol to download images and config
 # options are: scp/http/tftp/ftp/sftp
 protocol                = "scp" # protocol to use to download images/config

# Host name and user credentials
 username                = "root" # server account
 ftp_username            = "anonymous" # server account
 password                = "password" # password
 hostname                = "192.168.255.200" # ip address of ftp/scp/http/sftp server
 config_file_type        = "serial_number"
After you need to generate a md5 of the poap.py script. The following line will replace the second line with the MD5. If the MD5 is not valided the POAP process will fail and restart.
f=poap.py ; cat $f | sed '/^#md5sum/d' > $f.md5 ; sed -i "s/^#md5sum=.*/#md5sum=\"$(md5sum $f.md5 | sed 's/ .*//')\"/" $f
#!/bin/env python
#md5sum="3b614973cbde2742388b5997228678cd"
# Still needs to be implemented.
# Return Values:
You also need to generate an md5 for the image:
md5sum nxos.7.0.3.I5.2.bin > nxos.7.0.3.I5.2.bin.md5
Don’t forget your configuration file name “conf.XXXXXXX” where XXXX is the serial number and to configure the credential in this file.
To erase the startup-configuration, you need to enter the following command:
Switch# write erase
Warning: This command will erase the startup-configuration.
Do you wish to proceed anyway? (y/n)  [n] y
Leaf3# reload
This command will reboot the system. (y/n)?  [n] y