To test and verify your script you can use the virtual environment UCSPE.
First install Ucs.Manager Package on Powershell.
PS C:\WINDOWS\system32> Install-Module -Name Cisco.UCSManager -RequiredVersion 2.5.3.0
Verify Module is installed.
PS C:\WINDOWS\system32> Get-Package -Name *Ucs*
Name Version Source ProviderName
---- ------- ------ ------------
Cisco.UCS.Core 2.5.3.0 https://www.powershellgallery… PowerShellGet
Cisco.UCSManager 2.5.3.0 https://www.powershellgallery… PowerShellGet
Connect to UCS Manager. A pop-up will be open to enter your login and password.
PS C:\WINDOWS\system32> Connect-Ucs 10.0.100.162
applet de commande Connect-Ucs à la position 1 du pipeline de la commande
Fournissez des valeurs pour les paramètres suivants :
Credential
NumPendingConfigs : 0
Ucs : UCSPE-10-0-100-162
Cookie : 1594713831/e2c5faea-c1d9-412f-b7d1-b582c379477a
Domains : org-root
LastUpdateTime : 14/07/2020 10:03:54
Name : 10.0.100.162
NoSsl : False
NumWatchers : 0
Port : 443
Priv : {aaa, admin, ext-lan-config, ext-lan-policy…}
PromptOnCompleteTransaction : False
Proxy :
RefreshPeriod : 600
SessionId :
TransactionInProgress : False
Uri : https://10.0.100.162
UserName : ucspe
Version : 4.0(4e)
VirtualIpv4Address : 10.0.100.162
WatchThreadStatus : None
You can also enter directly your password.
PS C:\WINDOWS\system32> $ucsm_credentials = New-Object -TypeName System.Management.Automation.PSCredential -ArgumentList "ucspe", $(ConvertTo-SecureString -AsPlainText "ucspe" -Force)
PS C:\WINDOWS\system32> $ucsm_credentials
UserName Password
-------- --------
ucspe System.Security.SecureString
PS C:\WINDOWS\system32> Connect-Ucs 10.0.100.162 -Credential $ucsm_credentials
NumPendingConfigs : 0
Ucs : UCSPE-10-0-100-162
Cookie : 1594715399/f32ff405-981f-4c7a-817a-1d09324c89b6
Domains : org-root
LastUpdateTime : 14/07/2020 10:29:59
Name : 10.0.100.162
NoSsl : False
NumWatchers : 0
Port : 443
Priv : {aaa, admin, ext-lan-config, ext-lan-policy…}
PromptOnCompleteTransaction : False
Proxy :
RefreshPeriod : 600
SessionId :
TransactionInProgress : False
Uri : https://10.0.100.162
UserName : ucspe
Version : 4.0(4e)
VirtualIpv4Address : 10.0.100.162
WatchThreadStatus : None
You can disconnect with the following command:
PS C:\WINDOWS\system32> Disconnect-Ucs
Ucs : UCSPE-10-0-100-162
InCookie : 1594715399/f32ff405-981f-4c7a-817a-1d09324c89b6
Name : 10.0.100.162
OutStatus : success
SessionId :
Uri : https://10.0.100.162
Version : 4.0(4e)
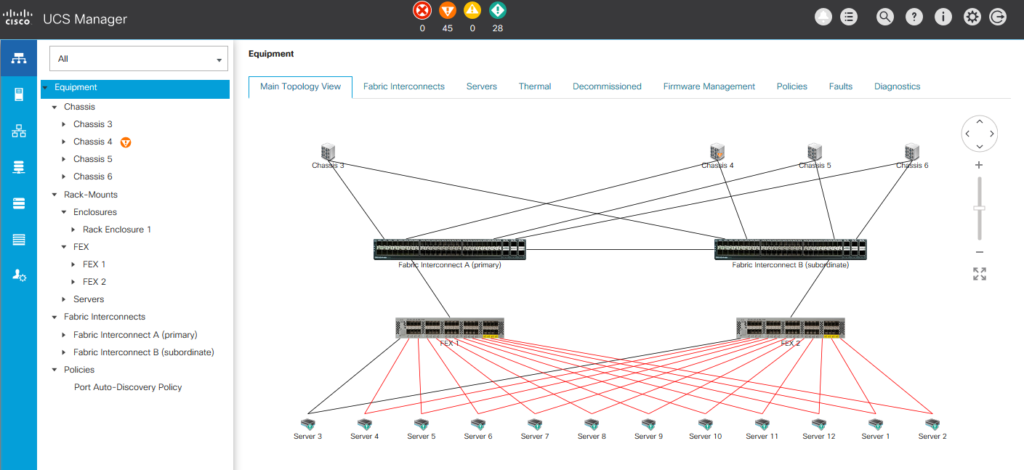
You can Get the UCS blades and servers with this command:
PS C:\WINDOWS\system32> Get-UcsServer
AdminPower : policy
AdminState : in-service
AssetTag :
AssignedToDn :
Association : none
Availability : available
AvailableMemory : 49152
ChassisId : 3
CheckPoint : discovered
ConnPath : {A, B}
ConnStatus : {A, B}
Descr :
Discovery : complete
DiscoveryStatus :
KmipFault : no
KmipFaultDescription :
Lc : undiscovered
LcTs : 1970-01-01T00:00:00.000
LocalId :
LowVoltageMemory : not-applicable
ManagingInst : A
MemorySpeed : not-applicable
MfgTime : not-applicable
Model : UCSB-EX-M4-1
Name :
NumOf40GAdaptorsWithOldFw : 0
NumOf40GAdaptorsWithUnknownFw : 0
NumOfAdaptors : 2
NumOfCores : 10
NumOfCoresEnabled : 10
NumOfCpus : 2
NumOfEthHostIfs : 0
NumOfFcHostIfs : 0
NumOfThreads : 16
OperPower : off
OperPwrTransSrc : unknown
OperQualifier : {}
OperQualifierReason : N/A
OperState : unassociated
Operability : operable
OriginalUuid : 1b4e28ba-2fa1-11d2-0301-b9a761bde3fb
PartNumber :
PolicyLevel : 0
PolicyOwner : local
Presence : equipped
Revision : 0
Sacl :
ScaledMode : single
Serial : SRV107
ServerId : 3/1
SlotId : 1
StorageOperQualifier : unknown
TotalMemory : 49152
UsrLbl :
Uuid : 1b4e28ba-2fa1-11d2-0301-b9a761bde3fb
Vendor : Cisco Systems Inc
Vid :
Ucs : UCSPE-10-0-100-162
Dn : sys/chassis-3/blade-1
Rn : blade-1
Status :
XtraProperty : {}
And you can filter the result with the pipe command and Select-Object
PS C:\WINDOWS\system32> Get-UcsServer | Select-Object Dn
Dn
sys/chassis-3/blade-1
sys/chassis-3/blade-3
sys/chassis-3/blade-7
sys/chassis-3/blade-5
sys/chassis-4/blade-1
sys/chassis-4/blade-2
sys/chassis-5/blade-1
sys/chassis-5/blade-2
sys/chassis-5/blade-3
sys/chassis-6/blade-1
sys/chassis-6/blade-2
sys/chassis-6/blade-3
sys/rack-unit-1
sys/rack-unit-2
sys/rack-unit-3
sys/rack-unit-4
sys/rack-unit-5
sys/rack-unit-6
sys/rack-unit-7
sys/rack-unit-8
sys/rack-unit-9
sys/rack-unit-10
sys/rack-unit-11
sys/rack-unit-12
or with two filters to Get the Serial for each server
PS C:\WINDOWS\system32> Get-UcsServer | Select-Object Dn,Serial
Dn Serial
-- ------
sys/chassis-3/blade-1 SRV107
sys/chassis-3/blade-3 SRV108
sys/chassis-3/blade-7 SRV110
sys/chassis-3/blade-5 SRV126
sys/chassis-4/blade-1 SRV111
sys/chassis-4/blade-2 SRV112
sys/chassis-5/blade-1 SRV113
sys/chassis-5/blade-2 SRV114
sys/chassis-5/blade-3 SRV115
sys/chassis-6/blade-1 SRV122
sys/chassis-6/blade-2 SRV124
sys/chassis-6/blade-3 SRV125
sys/rack-unit-1 ND80
sys/rack-unit-2 ND81
sys/rack-unit-3 RK46
sys/rack-unit-4 RK54
sys/rack-unit-5 RK57
sys/rack-unit-6 RK58
sys/rack-unit-7 RK59
sys/rack-unit-8 RK60
sys/rack-unit-9 RK62
sys/rack-unit-10 RK63
sys/rack-unit-11 RK64
sys/rack-unit-12 RK65
You can see Servers and Blades with the previous command or only the blade.
PS C:\WINDOWS\system32> Get-UcsBlade | Select-Object Dn,Serial
Dn Serial
-- ------
sys/chassis-3/blade-1 SRV107
sys/chassis-3/blade-3 SRV108
sys/chassis-3/blade-5 SRV126
sys/chassis-3/blade-7 SRV110
sys/chassis-4/blade-1 SRV111
sys/chassis-4/blade-2 SRV112
sys/chassis-5/blade-1 SRV113
sys/chassis-5/blade-2 SRV114
sys/chassis-5/blade-3 SRV115
sys/chassis-6/blade-1 SRV122
sys/chassis-6/blade-2 SRV124
sys/chassis-6/blade-3 SRV125
You can search all commands ucs and the documentation with the following commands:
PS C:\WINDOWS\system32> Get-Command -noun Ucs | more
CommandType Name Version Source
----------- ---- ------- ------
Alias Acknowledge-UcsBlade 2.5.3.0 Cisco.UcsManager
Alias Acknowledge-UcsChassis 2.5.3.0 Cisco.UcsManager
Alias Acknowledge-UcsFault 2.5.3.0 Cisco.UcsManager
Alias Acknowledge-UcsFex 2.5.3.0 Cisco.UcsManager
Alias Acknowledge-UcsRackUnit 2.5.3.0 Cisco.UcsManager
Alias Acknowledge-UcsServerUnit 2.5.3.0 Cisco.UcsManager
Alias Acknowledge-UcsSlot 2.5.3.0 Cisco.UcsManager
Alias Add-UcsMo 2.5.3.0 Cisco.UcsManager
Alias Associate-UcsServiceProfile 2.5.3.0 Cisco.UcsManager
Alias Compare-UcsMo 2.5.3.0 Cisco.UcsManager
Alias Decommission-UcsBlade 2.5.3.0 Cisco.UcsManager
Alias Decommission-UcsChassis 2.5.3.0 Cisco.UcsManager
Alias Decommission-UcsFex 2.5.3.0 Cisco.UcsManager
Alias Decommission-UcsRackUnit 2.5.3.0 Cisco.UcsManager
Alias Decommission-UcsServerUnit 2.5.3.0 Cisco.UcsManager
Alias Disable-UcsDiskLocatorLed 2.5.3.0 Cisco.UcsManager
Alias Disassociate-UcsServiceProfile 2.5.3.0 Cisco.UcsManager
Alias Enable-UcsDiskLocatorLed 2.5.3.0 Cisco.UcsManager
Alias Get-UcsCentral 2.5.3.0 Cisco.UcsManager
Alias Get-UcsMo 2.5.3.0 Cisco.UcsManager
Alias Get-UcsOs 2.5.3.0 Cisco.Ucs.Core
[..]

PS C:\WINDOWS\system32> Get-help Get-UcsServer
NOM
Get-UcsServer
RÉSUMÉ
Gets Managed Object of type ComputeBlade, ComputeRackUnit and ComputeServerUnit.
SYNTAXE
Get-UcsServer [-Ucs ] []
DESCRIPTION
Gets Managed Object of type ComputeBlade, ComputeRackUnit and ComputeServerUnit.
LIENS CONNEXES
REMARQUES
Pour consulter les exemples, tapez : "get-help Get-UcsServer -examples".
Pour plus d'informations, tapez : "get-help Get-UcsServer -detailed".
Pour obtenir des informations techniques, tapez : "get-help Get-UcsServer -full".
Vlans
Get Vlans
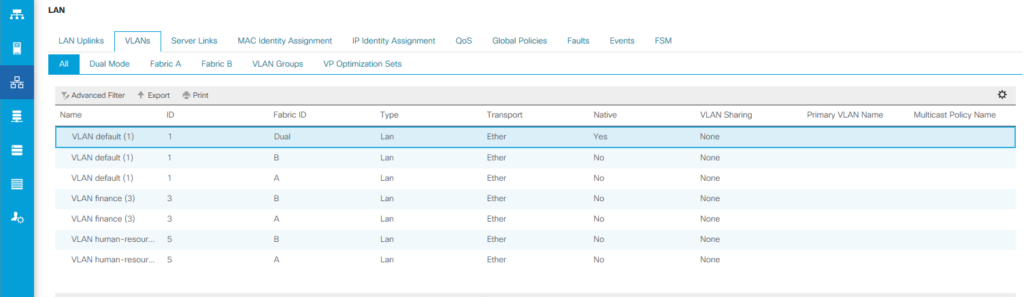
PS C:\WINDOWS\system32> Get-UCsVlan | Select-Object Dn,Name,Id,SwitchId
Dn Name Id SwitchId
-- ---- -- --------
fabric/eth-estc/net-default default 1 dual
fabric/lan/A/net-default default 1 A
fabric/lan/A/net-finance finance 3 A
fabric/lan/A/net-human-resource human-resource 5 A
fabric/lan/B/net-default default 1 B
fabric/lan/B/net-finance finance 3 B
fabric/lan/B/net-human-resource human-resource 5 B
fabric/lan/net-default default 1 dual
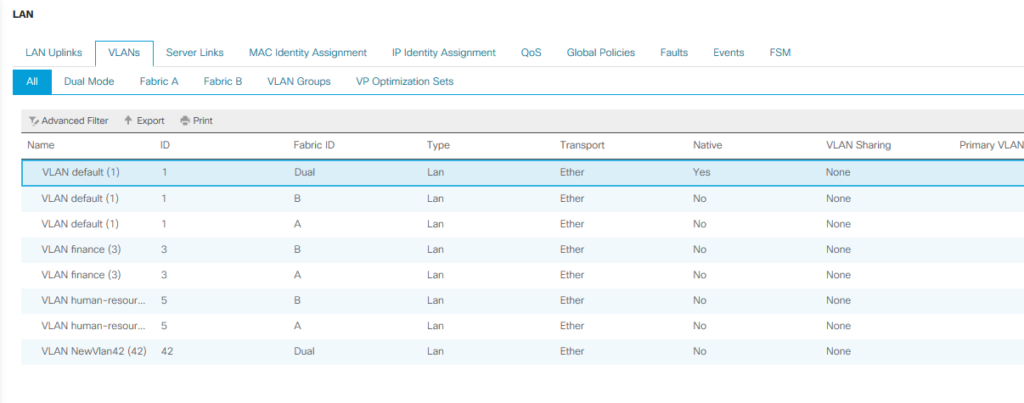
Add Vlans
PS C:\WINDOWS\system32> Get-help Add-UcsVlan
PS C:\WINDOWS\system32> Get-UcsLanCloud | Add-UcsVlan -Name NewVlan42 -Id 42
AssocPrimaryVlanState : ok
AssocPrimaryVlanSwitchId : NONE
Cloud : ethlan
CompressionType : included
ConfigIssues :
ConfigOverlap : ok
DefaultNet : no
EpDn :
Global : 0
Id : 42
IfRole : network
IfType : virtual
Local : 0
Locale : external
McastPolicyName :
Name : NewVlan42
OperMcastPolicyName :
OperState : ok
OverlapStateForA : active
OverlapStateForB : active
PeerDn :
PolicyOwner : local
PubNwDn :
PubNwId : 1
PubNwName :
Sacl :
Sharing : none
SwitchId : dual
Transport : ether
Type : lan
Ucs : UCSPE-10-0-100-162
Dn : fabric/lan/net-NewVlan42
Rn : net-NewVlan42
Status : created
XtraProperty : {}
Verify
PS C:\WINDOWS\system32> Get-UCsVlan | Select-Object Dn,Name,Id,SwitchId
Dn Name Id SwitchId
-- ---- -- --------
fabric/eth-estc/net-default default 1 dual
fabric/lan/A/net-default default 1 A
fabric/lan/A/net-finance finance 3 A
fabric/lan/A/net-human-resource human-resource 5 A
fabric/lan/B/net-default default 1 B
fabric/lan/B/net-finance finance 3 B
fabric/lan/B/net-human-resource human-resource 5 B
fabric/lan/net-default default 1 dual
fabric/lan/net-NewVlan42 NewVlan42 42 dual
In addition to Powershell, you can also use the python SDK (Docs).
Example to add a new vlan:
from ucsmsdk.ucshandle import UcsHandle
from ucsmsdk.mometa.fabric.FabricVlan import FabricVlan
Create a connection handle
handle = UcsHandle("10.0.100.162", "ucspe", "ucspe")
Login to the server
handle.login()
fabric_lan_dn = handle.query_dn("fabric/lan")
newvlan = FabricVlan(parent_mo_or_dn=fabric_lan_dn,
name = "vlan10",
id="10")
handle.add_mo(newvlan)
handle.commit()
Logout from the server
handle.logout()
Service Profile
PS C:\WINDOWS\system32> Get-UcsServiceProfile
AgentPolicyName :
AssignState : unassigned
AssocState : unassociated
BiosProfileName :
BootPolicyName :
ConfigQualifier : {}
ConfigState : not-applied
Descr :
DynamicConPolicyName :
ExtIPPoolName : ext-mgmt
ExtIPState : none
GraphicsCardPolicyName :
HostFwPolicyName :
IdentPoolName :
KvmMgmtPolicyName :
LocalDiskPolicyName :
MaintPolicyName :
MgmtAccessPolicyName :
MgmtFwPolicyName :
Name : ServiceProfile1
OperBiosProfileName :
OperBootPolicyName : org-root/boot-policy-default
OperDynamicConPolicyName :
OperExtIPPoolName :
OperGraphicsCardPolicyName : org-root/graphics-card-policy-default
OperHostFwPolicyName : org-root/fw-host-pack-default
OperIdentPoolName :
OperKvmMgmtPolicyName : org-root/kvm-mgmt-policy-default
OperLocalDiskPolicyName : org-root/local-disk-config-default
OperMaintPolicyName : org-root/maint-default
OperMgmtAccessPolicyName :
OperMgmtFwPolicyName :
OperPersistentMemoryPolicyName :
OperPowerPolicyName : org-root/power-policy-default
OperPowerSyncPolicyName : org-root/power-sync-default
OperScrubPolicyName : org-root/scrub-default
OperSolPolicyName :
OperSrcTemplName :
OperState : unassociated
OperStatsPolicyName : org-root/thr-policy-default
OperVconProfileName :
OperVmediaPolicyName :
Owner : management
PersistentMemoryPolicyName :
PnDn :
PolicyLevel : 0
PolicyOwner : local
PowerPolicyName : default
PowerSyncPolicyName :
PropAcl : 0
ResolveRemote : yes
Sacl :
ScrubPolicyName :
SolPolicyName :
SrcTemplName :
StatsPolicyName : default
SvnicConfig : yes
Type : instance
UsrLbl :
Uuid : derived
UuidSuffix : 0000-000000000000
VconProfileName :
VmediaPolicyName :
Ucs : UCSPE-10-0-100-162
Dn : org-root/ls-ServiceProfile1
Rn : ls-ServiceProfile1
Status :
XtraProperty : {}
A lot of examples can be found here : https://github.com/CiscoUcs