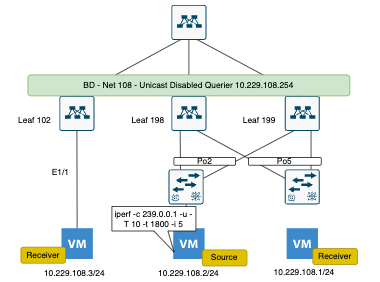
This fabric runs ACI 5.3(1d). We have three VMs in the Layer-2 BD Net-108. One VM is connected to Leaf 102, and other VMs are behind a UCS-B in vPC. All VMs are in the subnet 10.229.108.0/24.
ACI Topology
We use the following options for the BD:
L2 Unknown Unicast: HW Proxy
L3 Unknown Multicast Flooding: Optimized
Multi Destination Flooding: Flood in BD
We use the default IGMP Snooping Policy:
IGMP Snooping Policy – Default
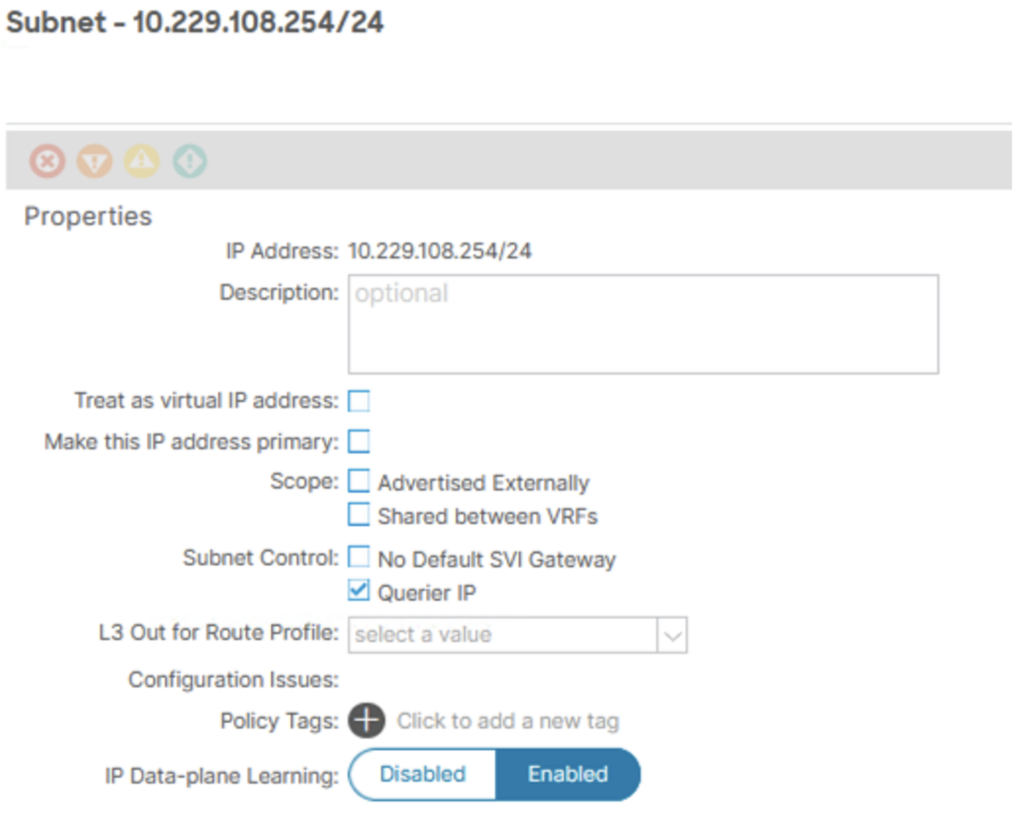
It’s a L2 BD, we have Unicast Routing: disabled. We need a IGMP Querier. Here we will use: 10.229.108.254, which is an unused IP address in this subnet.
IGMP Querier
Linux Packages
To generate flow on VMs, we have two packages:
smcroute
iperf
In addition, we use tcpdump to capture packets. smcroute is used to join or leave the multicast group.
We can check if the group is present with ip maddr
Example:
svr# ip maddr
1:	lo
	inet  224.0.0.1
	inet6 ff02::1
	inet6 ff01::1
2:	ens192
	[..]
	inet  239.0.0.1
To generate the flow (Sender) we used iperf.
srv# iperf -c 239.0.0.1 -u -T 10 -t 1800 -i 5
ACI verification
First we can check which querier are present in the leaf:
APIC01# fabric 102 show ip igmp snooping querier
----------------------------------------------------------------
 Node 102 (LEAF-102)
----------------------------------------------------------------
Vlan  IP Address       Version   Expires     Port
37    10.2.0.30        v3        00:01:01     Switch querier
74    10.229.108.254   v3        00:01:51     Switch querier
Here we use the querier 10.229.108.254, which is associated to the internal vlan 74. We can see one group: 239.0.0.1 on the port Eth1/1.
APIC01# fabric 102  show ip igmp snooping groups vlan 74
----------------------------------------------------------------
 Node 102 (LEAF-102)
----------------------------------------------------------------
Type: S - Static, D - Dynamic, R - Router port, F - Fabricpath core port

Vlan  Group Address      Ver  Type  Port list
74    239.0.0.1          v3   D     Eth1/1
In addition, we can verify the IGMP Snooping parameters for that vlan.
APIC01# fabric 102  show ip igmp snooping vlan 74
----------------------------------------------------------------
 Node 102 (LEAF-102)
----------------------------------------------------------------
IGMP Snooping information for vlan 74
  IGMP snooping enabled
  Lookup mode: IP
  Optimised Multicast Flood (OMF) enabled
  IGMP querier present, address: 10.229.108.254, version: 3
  Querier interval: 125 secs
  Querier last member query interval: 1 secs
  Querier robustness: 2
  Switch-querier enabled, address 10.229.108.254/24, currently running
  IGMPv3 Explicit tracking enabled
  IGMPv2 Fast leave disabled
  IGMPv1/v2 Report suppression enabled
  IGMPv3 Report suppression enabled
  Link Local Groups suppression enabled
  Router port detection using PIM Hellos, IGMP Queries
  Number of router-ports: 0
  Number of groups: 2
  Multicast Routing disabled on VLAN
  Active ports:
    Eth1/1
Enter the following command to repartition the disk: init system
switch(boot)# ?
Exec commands:
  clear      Reset functions
  config     Enter configuration mode
  copy       Copy from one file to another
  delete     Delete a file or directory
  dir        Directory listing for files
  exit       Exit from the EXEC
  find       Find a file below the current directory
  format     Format disks
  init       Initialize internal disk
  load       Load system image
  load-nxos  Load nxos image
  mkdir      Create new directory
  move       Move files
  no         Disable debugging functions
  pwd        View current directory
  reload     Reboot this supervisor module
  rmdir      Remove existing directory
  show       Show running system information
  sleep      Sleep for the specified number of seconds
  ssh        SSH to another system
  start      Load bash shell
  tail       Display the last part of a file
  telnet     Telnet to another system
  terminal   Set terminal line parameters
  write      Write current configuration

switch(boot)# init system check-filesystem
This command is going to erase your startup-config, licenses as well as the contents of your bootflash:.
Do you want to continue? (y/n)  [n] y
Initializing the system ...
Checking flash ...
Erasing Flash ...
Partitioning ...
Partitioning successfull
Formatting bootloader: ...
mke2fs 1.42.9 (28-Dec-2013)
Checking for bad blocks (read-only test): done
Initializing startup-config and licenses ...
Formatting cfg0: ...
mke2fs 1.42.9 (28-Dec-2013)
Checking for bad blocks (read-only test): done
Formatting cfg1: ...
mke2fs 1.42.9 (28-Dec-2013)
Checking for bad blocks (read-only test): done
Formatting pss: ...
mke2fs 1.42.9 (28-Dec-2013)
Checking for bad blocks (read-only test): done
Formatting plog: ...
mke2fs 1.42.9 (28-Dec-2013)
Checking for bad blocks (read-only test): done
Formatting bootflash: ...
mke2fs 1.42.9 (28-Dec-2013)
Checking for bad blocks (read-only test): done
Formatting logflash: ...
mke2fs 1.42.9 (28-Dec-2013)
Checking for bad blocks (read-only test): done
Mounting ...
mount: can't find /mnt/plog in /etc/fstab
ERROR: cannot mount filesystem
Resetting CMOS to default configuration ...
Reinitializing NVRAM contents ...
Initialization completed.
Now your disk is empty but the size have been increase.
switch(boot)# dir
16384 Sep 16 2020 10:53:54 lost+found/
Usage for bootflash: filesystem
2783354880 bytes used
50802970624 bytes free
53586325504 bytes total
At this time, the best way is to copy the NXOS image from USB or TFTP to bootflash and the reload.
AWX is a GUI tool for Ansible. In this article we will deploy AWX on a Kubernetes cluster. We also have GitLab-CE to store playbooks and manage the version.
The first step is to clone AWX:
git clone https://github.com/ansible/awx.git
Then you need to complete the inventory file. AWX will be deployed with Ansible. You also need to have Ansible, Helm and kubectl installed.
The installation is explained here: https://github.com/ansible/awx/blob/devel/INSTALL.md
You need to modify some variables to describe which K8s cluster you will use:
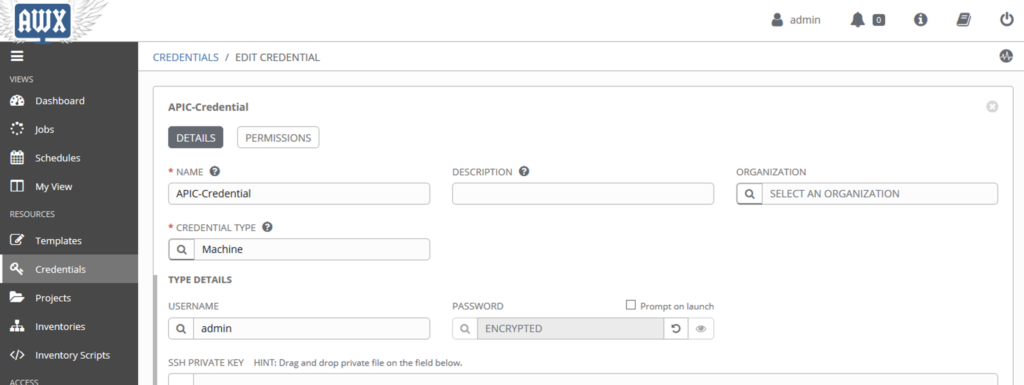
Here we will create a new credential. With Cisco ACI, we will use the credential type: Machine.
We will be able to use it with the following parameter in the playbook:
ansible_username
ansible_password
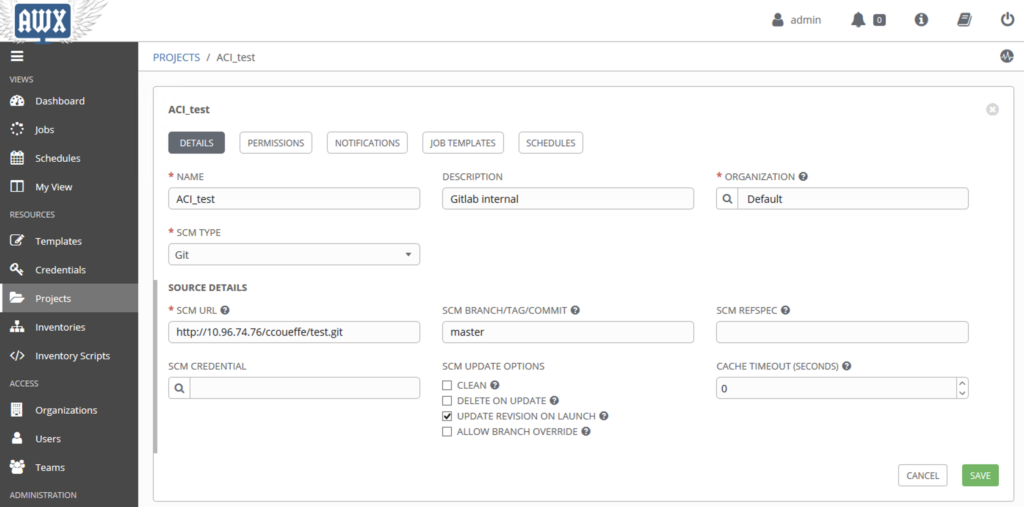
Create a project
Now we create a project. The project will point to a Gitlab repository. We have also selected the option : “Update Revision on launch”. This option permits to synchronize Gitlab and get the last version.
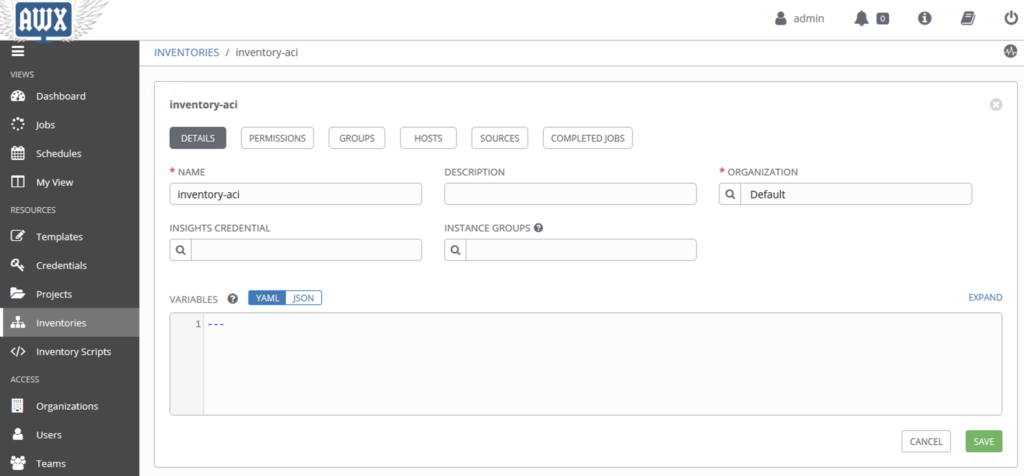
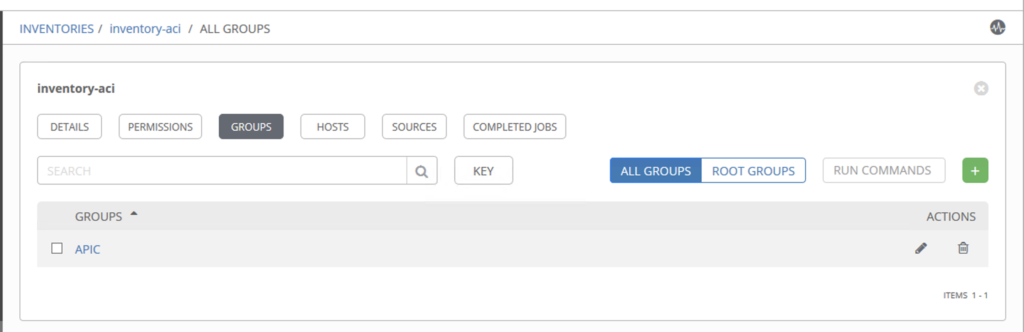
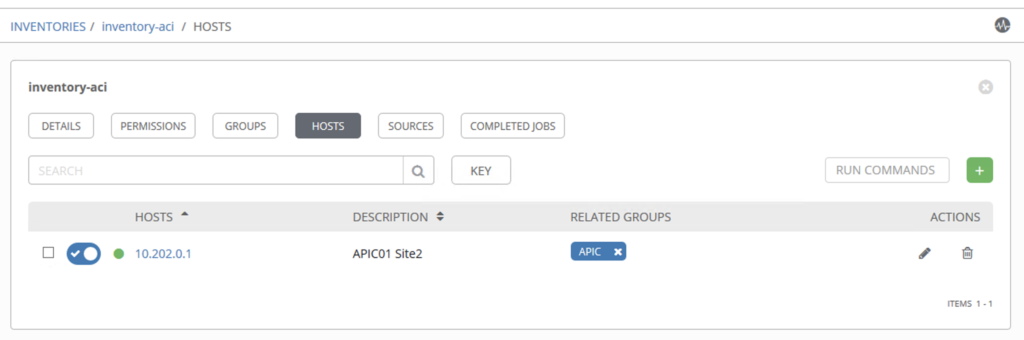
Create an inventory
In this step we will create an inventory, which contains a Group: APIC with one host : 10.202.0.1 (the ACI controller)
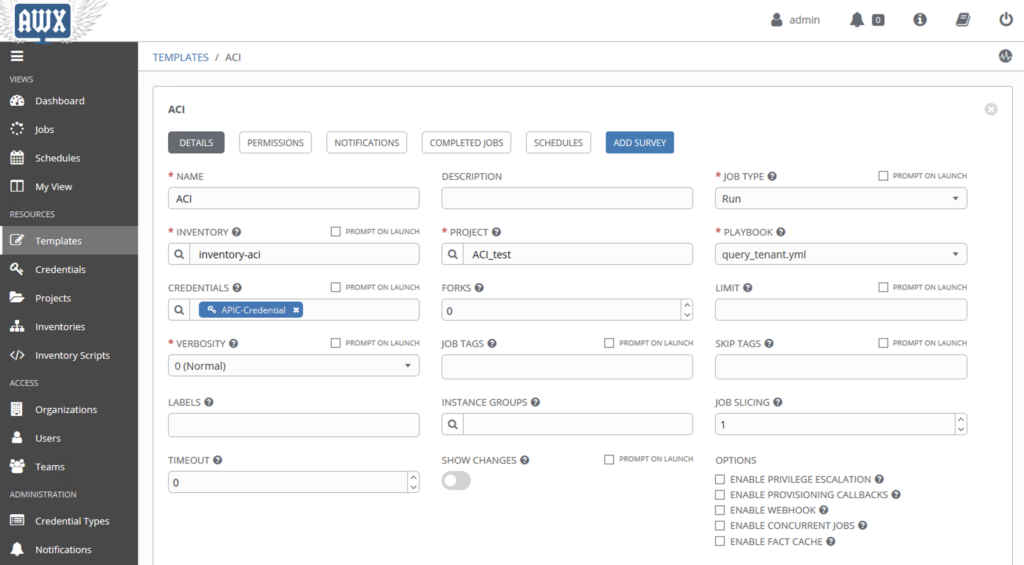
Create a job
Now we need to create one job to play the playbook in GitLab with the inventory and credential in AWX.
You need to enter :
A name
Job type : Run
Inventory, where you select the previous inventory
Project: Just a name
Playbook, where you select the playbook from Git. If you see nothing, the playbook is probably not good.
Credentials, where you select your credential
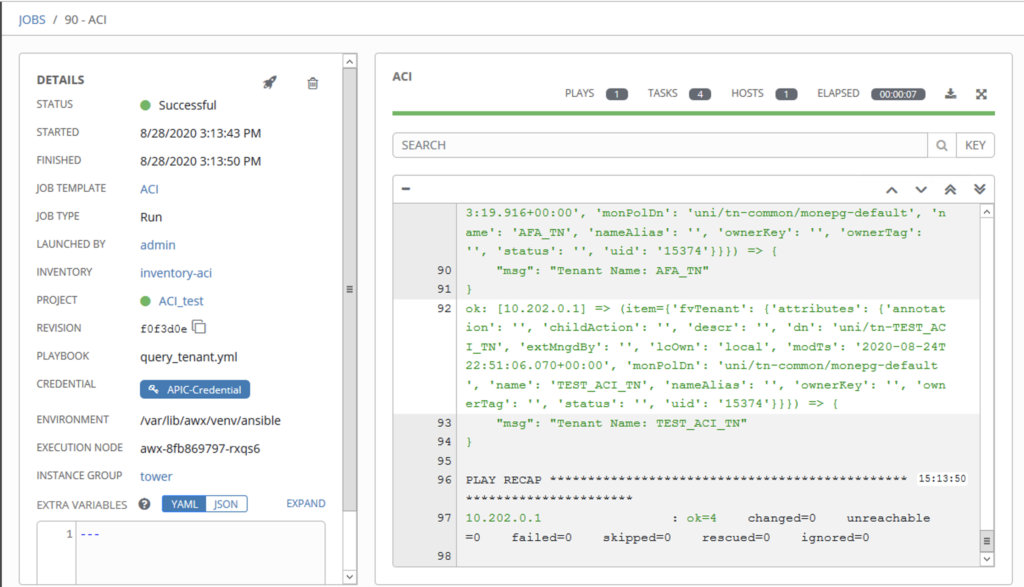
If everything is good, you can save your Template and launch it.
Play template
After click on the launch button, you will see the following window.
In this article, we will see how to optimize your time during your Day-0 with Cisco Nexus N9K using POAP and Ansible.
Topology Overview
In this infrastructure, we have :
one Cisco Nexus N9Kv
one Cisco router to split the mgmt Out-Of-Band (OOB) network used by Nexus (interface mgmt 0)
one linux server running on Ubuntu.
The Ubuntu server will run the following services :
DHCP server to assign IP addresses and return the path for the tftp server
TFTP server to host and deliver the poap python script
SCP and / or HTTP server to host and deliver the Nexus images and configuration file
We will use two different networks where the router will be the default gateway for each one:
10.0.1.0/24 – GW .254, used for the OOB network
10.0.2.0/24 – GW .254, used to host administration tools
The server will have the IP address 10.0.2.1/24 and we will use 10.0.1.100/24 for the Nexus 9Kv.
The network services
DHCP server
For the DHCP server, we will use isc-dhcp-server.
You can easily install with the following command this package:
apt-get install isc-dhcp-server
Then you need to configure your server. In this topology the router will be a DHCP Relay, that means request from N9Kv will arrive to this server in unicast with the IP (10.0.1.254) on the router.
Router configuration:
interface Ethernet0/1
ip address 10.0.1.254 255.255.255.0
ip helper-address 10.0.2.1
end
For the server configuration, we need to add at least a subnet pool for your own network : 10.0.2.0/24. If you don’t have a network which listen on your network, the server will not start.
You need also to create a range for your N9Kv : 10.0.1.0/24. For this range, we will provide :
The default gateway (option routers)
The tftp server (option tftp-server-name)
The file, which should be used on the tftp server (option bootfile-name)
In this file we will also create one entry for our N9Kv. We will reserve an IP address based on the Serial Number. The S/N should be prefixed with : \000.
root@ubuntu:/srv/tftp/poap# service isc-dhcp-server start
root@ubuntu:/srv/tftp/poap# service isc-dhcp-server status
* isc-dhcp-server.service - ISC DHCP IPv4 server
   Loaded: loaded (/lib/systemd/system/isc-dhcp-server.service; enabled; vendor preset: enabled)
   Active: active (running) since Sun 2020-08-23 21:12:52 EEST; 16h ago
     Docs: man:dhcpd(8)
 Main PID: 14027 (dhcpd)
    Tasks: 1
   Memory: 8.5M
      CPU: 563ms
   CGroup: /system.slice/isc-dhcp-server.service
           `-14027 dhcpd -user dhcpd -group dhcpd -f -4 -pf /run/dhcp-server/dhcpd.pid -cf /etc/dhcp/dhcpd.conf

Aug 24 13:22:29 ubuntu dhcpd[14027]: DHCPREQUEST for 10.0.2.1 from 00:50:00:00:03:00 via ens3: unknown lease 10.0.2.1.
Aug 24 13:22:30 ubuntu dhcpd[14027]: DHCPREQUEST for 10.0.2.1 from 00:50:00:00:03:00 via ens3: unknown lease 10.0.2.1.
Aug 24 13:22:39 ubuntu dhcpd[14027]: DHCPREQUEST for 10.0.2.1 from 00:50:00:00:03:00 via ens3: unknown lease 10.0.2.1.
Aug 24 13:22:40 ubuntu dhcpd[14027]: DHCPREQUEST for 10.0.2.1 from 00:50:00:00:03:00 via ens3: unknown lease 10.0.2.1.
Aug 24 13:22:42 ubuntu dhcpd[14027]: DHCPREQUEST for 10.0.2.1 from 00:50:00:00:03:00 via ens3: unknown lease 10.0.2.1.
Aug 24 13:22:58 ubuntu dhcpd[14027]: DHCPREQUEST for 10.0.2.1 from 00:50:00:00:03:00 via ens3: unknown lease 10.0.2.1.
Aug 24 13:22:59 ubuntu dhcpd[14027]: DHCPREQUEST for 10.0.2.1 from 00:50:00:00:03:00 via ens3: unknown lease 10.0.2.1.
Aug 24 13:23:00 ubuntu dhcpd[14027]: DHCPREQUEST for 10.0.2.1 from 00:50:00:00:03:00 via ens3: unknown lease 10.0.2.1.
Aug 24 13:23:07 ubuntu systemd[1]: Started ISC DHCP IPv4 server.
Aug 24 13:23:07 ubuntu dhcpd[14027]: DHCPREQUEST for 10.0.2.1 from 00:50:00:00:03:00 via ens3: unknown lease 10.0.2.1.
TFTP server
For the TFTP server, we will use atftp. To install it enter the following command :
root@ubuntu:/srv/tftp/poap# apt install atftpd
By default the configuration file is located on /etc/default/atftpd. You can setup the path where is located your files.
You have different version. We will describe one after.
SCP server
You need also a server to deliver the Nexus images and the configuration file. Prefer to use a secure server like an scp or https server.
Here we will simply use opeenssh-server as scp server and create one service account: poap.
We can see one poap user, where the homedirectory is located on /srv/tftp/
poap:x:1001:1001::/srv/tftp/:
poap.py
Now we have our services, we need to prepare the poap.py script.
In this script, we will provide some information:
the target NXOS version
the path where are located the images
the path where are located the configurations
the credential for scp
the mode used to obtain the config file in our case: serial_number
Extract of the poap.py file:
# **** Here are all variables that parametrize this script ****
# These parameters should be updated with the real values used
# in your automation environment

# system and kickstart images, configuration: location on server (src) and target (dst)
n9k_image_version       = "9.3.2" # this must match your code version
image_dir_src           = "/srv/tftp/poap/"  # Sample - /Users/bob/poap
ftp_image_dir_src_root  = image_dir_src
tftp_image_dir_src_root = image_dir_src
n9k_system_image_src    = "nxos.%s.bin" % n9k_image_version
config_file_src         = "/srv/tftp/poap/conf/conf" # Sample - /Users/bob/poap/conf
image_dir_dst           = "bootflash:" # directory where n9k image will be stored
system_image_dst        = n9k_system_image_src
config_file_dst         = "volatile:poap.cfg"
md5sum_ext_src          = "md5"
# Required space on /bootflash (for config and system images)
required_space          = 350000

# copy protocol to download images and config
# options are: scp/http/tftp/ftp/sftp
protocol                = "scp" # protocol to use to download images/config

# Host name and user credentials
username                = "poap" # server account
ftp_username            = "anonymous" # server account
password                = "cisco1234" # password
hostname                = "10.0.2.1" # ip address of ftp/scp/http/sftp server

# vrf info
vrf = "management"
if os.environ.has_key('POAP_VRF'):
    vrf=os.environ['POAP_VRF']

# Timeout info (from biggest to smallest image, should be f(image-size, protocol))
system_timeout          = 2100
config_timeout          = 120
md5sum_timeout          = 120

# POAP can use 3 modes to obtain the config file.
# - 'static' - filename is static
# - 'serial_number' - switch serial number is part of the filename
# - 'location' - CDP neighbor of interface on which DHCPDISCOVER arrived
#                is part of filename
# if serial-number is abc, then filename is $config_file_src.abc
# if cdp neighbor's device_id=abc and port_id=111, then filename is config_file_src.abc.111
# Note: the next line can be overwritten by command-line arg processing later
config_file_type        = "serial_number"
After you changed something on this file, you need to generate the md5 with the command within the script :
f=poap.py ; cat $f | sed '/^#md5sum/d' > $f.md5 ; sed -i "s/^#md5sum=./#md5sum=\"$(md5sum $f.md5 | sed 's/ .//')\"/" $f
You need also to prepare the configuration file. Basically you need to provide the minimum like :
the admin credential
the IP address for the management interface
the default gateway for the management vrf.
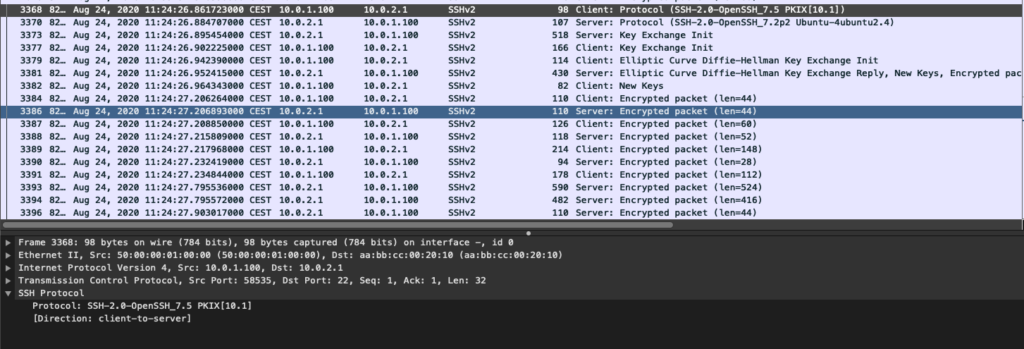
One other recommendation is also to add one other account, which can be used to push the Post-Configuration. In my case, I added one account for ansible with an ssh key.
If you want to do the same, you need to create one new user dedicated for ansible, generated one RSA key and put the public key on your configuration.
Example:
#adduser ansible
#su - ansible
#ssh-keygen

ansible@ubuntu:/srv/tftp/poap# ssh-keygen
Generating public/private rsa key pair.
Enter file in which to save the key (/ansible/.ssh/id_rsa):
Enter passphrase (empty for no passphrase):
Enter same passphrase again:
Your identification has been saved in /ansible/.ssh/id_rsa.
Your public key has been saved in /ansible/.ssh/id_rsa.pub.
The key fingerprint is:
SHA256:9YHPgARV1M1o0OhO/XLPiRqFBnqP+aIY3AXdWxwZqKQ root@ubuntu
The key's randomart image is:
+---[RSA 2048]----+
| .ooo+=.o | | ..ooo.+ |
| .++=+.o |
| Eoo+==. |
| .S= ++o |
| . . o * o o |
| o . o o o.o.|
| o .. .. .o|
| . .. .o. |
+----[SHA256]-----+
At this time your Cisco Nexus device is probably up and loop in the poap.
..2020 Aug 24 08:04:39 %$ VDC-1 %$ %CARDCLIENT-2-FPGA_BOOT_GOLDEN: IOFPGA booted from Golden
2020 Aug 24 08:04:39 %$ VDC-1 %$ %CARDCLIENT-2-FPGA_BOOT_STATUS: Unable to retrieve MIFPGA boot status
..System is coming up … Please wait …
…Starting Auto Provisioning …
2020 Aug 24 08:05:13 %$ VDC-1 %$ %VDC_MGR-2-VDC_ONLINE: vdc 1 has come online
Done
Abort Power On Auto Provisioning yes/skip/no yes - continue with normal setup, skip - bypass password and basic configuration, no - continue with Power On Auto Provisioning [no]:
Abort Power On Auto Provisioning yes - continue with normal setup, skip - bypass password and basic configuration, no - continue with Power On Auto Provisioning[no]: 2020 Aug 24 08:05:23 switch %$ VDC-1 %$ %POAP-2-POAP_INITED: [90IFLAUVL3T-50:00:00:01:00:07] - POAP process initialized
2020 Aug 24 08:05:39 switch %$ VDC-1 %$ %POAP-2-POAP_INFO: [90IFLAUVL3T-50:00:00:01:00:07] - USB Initializing Success
2020 Aug 24 08:05:39 switch %$ VDC-1 %$ %POAP-2-POAP_INFO: [90IFLAUVL3T-50:00:00:01:00:07] - USB disk not detected
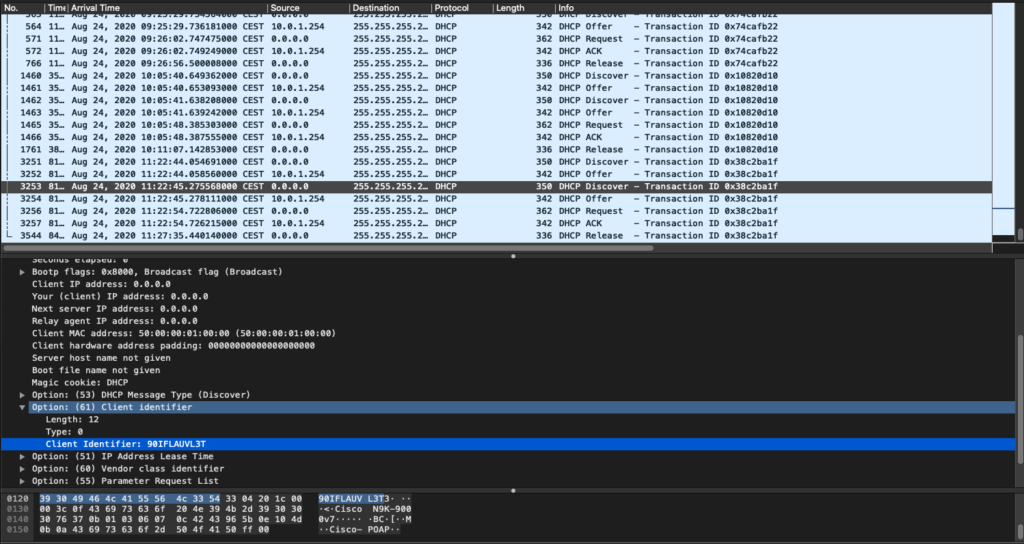
Now your switch will start the process. First it will ask an IP address, the server will answer with some other parameter, basically a tftp-server address and a filename.
On the DHCP Discover phase you can see the Serial Number inside one option (61). This option will use to reserve one IP Address.
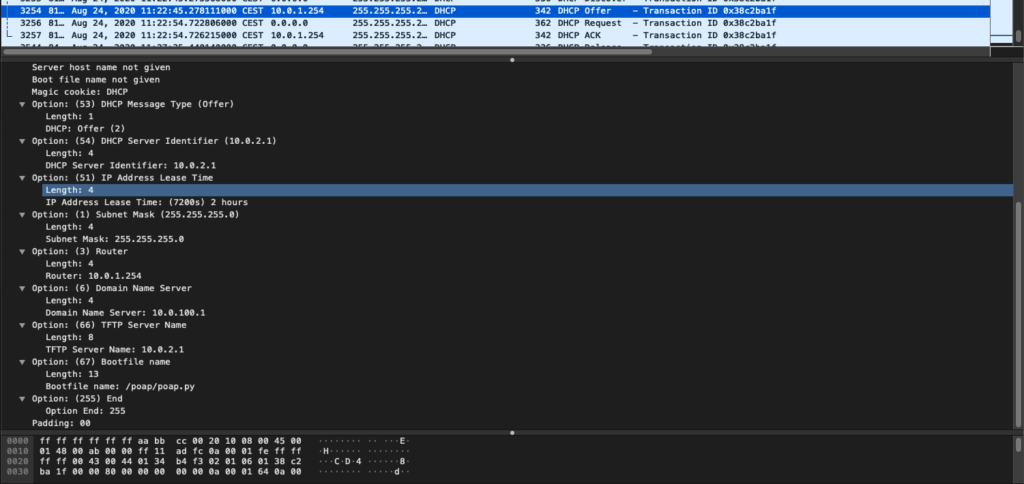
The server will offer the IP address, etc.
On the server DHCP side we can see the source is 10.0.1.254, which is the default GW for the mgmt subnet, where we have configure the DHCP Relay.
Aug 24 12:22:54 ubuntu dhcpd[14027]: from the dynamic address pool for 10.0.1.0/24
Aug 24 12:22:54 ubuntu dhcpd[14027]: uid lease 10.0.1.1 for client 50:00:00:01:00:00 is duplicate on 10.0.1.0/24
Aug 24 12:22:54 ubuntu dhcpd[14027]: DHCPREQUEST for 10.0.1.100 (10.0.2.1) from 50:00:00:01:00:00 via 10.0.1.254
Aug 24 12:22:54 ubuntu dhcpd[14027]: DHCPACK on 10.0.1.100 to 50:00:00:01:00:00 via 10.0.1.254
One the Nexus console we can observe the following logs :
2020 Aug 24 08:05:40 switch %$ VDC-1 %$ %POAP-2-POAP_INFO: Recieved DHCP offer from server ip - 10.0.2.1
2020 Aug 24 08:05:48 switch %$ VDC-1 %$ last message repeated 1 time
2020 Aug 24 08:05:48 switch %$ VDC-1 %$ %POAP-2-POAP_INFO: [90IFLAUVL3T-50:00:00:01:00:07] - Using DHCP, valid information received over mgmt0 from 10.0.2.1
2020 Aug 24 08:05:48 switch %$ VDC-1 %$ %POAP-2-POAP_INFO: [90IFLAUVL3T-50:00:00:01:00:07] - Assigned IP address: 10.0.1.100
2020 Aug 24 08:05:48 switch %$ VDC-1 %$ %POAP-2-POAP_INFO: [90IFLAUVL3T-50:00:00:01:00:07] - Netmask: 255.255.255.0
2020 Aug 24 08:05:48 switch %$ VDC-1 %$ %POAP-2-POAP_INFO: [90IFLAUVL3T-50:00:00:01:00:07] - DNS Server: 10.0.100.1
2020 Aug 24 08:05:48 switch %$ VDC-1 %$ %POAP-2-POAP_INFO: [90IFLAUVL3T-50:00:00:01:00:07] - Default Gateway: 10.0.1.254
2020 Aug 24 08:05:48 switch %$ VDC-1 %$ %POAP-2-POAP_INFO: [90IFLAUVL3T-50:00:00:01:00:07] - Script Server: 10.0.2.1
2020 Aug 24 08:05:48 switch %$ VDC-1 %$ %POAP-2-POAP_INFO: [90IFLAUVL3T-50:00:00:01:00:07] - Script Name: /poap/poap.py
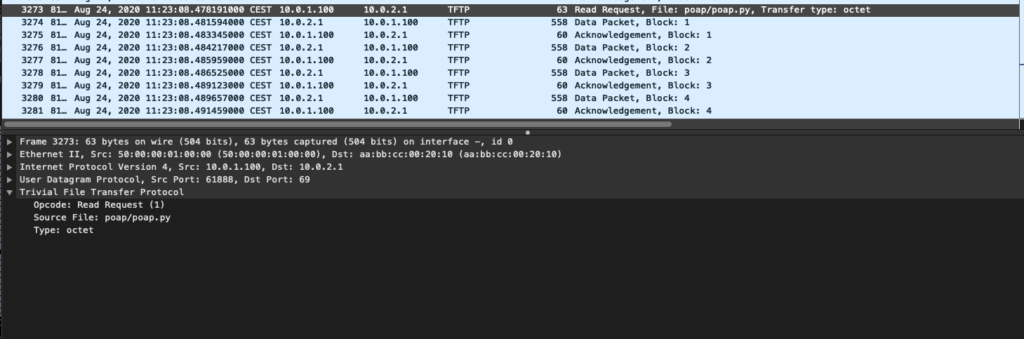
2020 Aug 24 08:06:00 switch %$ VDC-1 %$ %POAP-2-POAP_INFO: [90IFLAUVL3T-50:00:00:01:00:07] - The POAP Script download has started
2020 Aug 24 08:06:00 switch %$ VDC-1 %$ %POAP-2-POAP_INFO: [90IFLAUVL3T-50:00:00:01:00:07] - The POAP Script is being downloaded from [copy tftp://10.0.2.1//poap/poap.py bootflash:scripts/script.sh vrf management ]
2020 Aug 24 08:06:05 switch %$ VDC-1 %$ %USER-1-SYSTEM_MSG: SWINIT failed. devid:241 inst:0 - t2usd
2020 Aug 24 08:06:10 switch %$ VDC-1 %$ %POAP-2-POAP_SCRIPT_DOWNLOADED: [90IFLAUVL3T-50:00:00:01:00:07] - Successfully downloaded POAP script file
2020 Aug 24 08:06:10 switch %$ VDC-1 %$ %POAP-2-POAP_INFO: [90IFLAUVL3T-50:00:00:01:00:07] - Script file size 20390, MD5 checksum 89f5b64624dcd4c2350dbece6aaf3bab
2020 Aug 24 08:06:10 switch %$ VDC-1 %$ %POAP-2-POAP_INFO: [90IFLAUVL3T-50:00:00:01:00:07] - MD5 checksum received from the script file is 89f5b64624dcd4c2350dbece6aaf3bab
2020 Aug 24 08:06:10 switch %$ VDC-1 %$ %POAP-2-POAP_SCRIPT_STARTED_MD5_VALIDATED: [90IFLAUVL3T-50:00:00:01:00:07] - POAP script execution started(MD5 validated)
2020 Aug 24 08:07:25 switch %$ VDC-1 %$ %ASCII-CFG-2-CONF_CONTROL: System ready
If everything is good, you have an IP address and download in TFTP the poap.py script. Next the script will verify if you run the target image and download the configuration in SCP.
Finally, you will reload the device.
2020 Aug 24 09:23:20 switch %$ VDC-1 %$ %USER-1-SYSTEM_MSG: SWINIT failed. devid:241 inst:0  - t2usd
2020 Aug 24 09:24:53 switch %$ VDC-1 %$ %ASCII-CFG-2-CONF_CONTROL: System ready
2020 Aug 24 09:25:22 switch %$ VDC-1 %$ %VMAN-2-ACTIVATION_STATE: Successfully activated virtual service 'guestshell+'
2020 Aug 24 09:25:22 switch %$ VDC-1 %$ %VMAN-2-GUESTSHELL_ENABLED: The guest shell has been enabled. The command 'guestshell' may be used to access it, 'guestshell destroy' to remove it.
2020 Aug 24 09:27:35 switch %$ VDC-1 %$ %POAP-2-POAP_SCRIPT_EXEC_SUCCESS: [90IFLAUVL3T-50:00:00:01:00:07] - POAP script execution success
2020 Aug 24 09:27:41 switch %$ VDC-1 %$ %POAP-2-POAP_RELOAD_DEVICE: [90IFLAUVL3T-50:00:00:01:00:07] - Reload device
2020 Aug 24 09:27:51 switch %$ VDC-1 %$ %VMAN-2-ACTIVATION_STATE: Successfully deactivated virtual service 'guestshell+'
2020 Aug 24 09:27:53 switch %$ VDC-1 %$ %PLATFORM-2-PFM_SYSTEM_RESET: Manual system restart from Command Line Interface
[  731.127762] sysrq: SysRq : Resetting
Sysconf checksum failed. Using default values
WARNING:  No BIOS Info found
Sysconf checksum failed. Using default values
Sysconf checksum failed. Using default values
Sysconf checksum failed. Using default values
ATE0Q1&D2&C1S0=1
Standalone chassis
check_bootmode: grub2pxe: grub failed, launch ipxe
Trying to load ipxe
Loading Application:
/Vendor(429bdb26-48a6-47bd-664c-801204061400)/UnknownMedia(6)/EndEntire
cannot load imageFailed to launch ipxe
Came back to grub, now load efi shell
Trying to load efishell
Loading Application:
/Vendor(429bdb26-48a6-47bd-664c-801204061400)/UnknownMedia(6)/EndEntire
cannot load imageFailed to launch shell
Trying to read config file /boot/grub/menu.lst.local from (hd0,4)
 Filesystem type is ext2fs, partition type 0x83

Booting bootflash:/nxos.9.3.2.bin ...
Booting bootflash:/nxos.9.3.2.bin
Trying diskboot
 Filesystem type is ext2fs, partition type 0x83
Image valid
[..]
Installing local RPMS
Patch Repository Setup completed successfully
Bootstrapping via POAP overriding existing startup-config
Creating /dev/mcelog
Starting mcelog daemon
INIT: Entering runlevel: 3
Running S93thirdparty-script...

Populating conf files for hybrid sysmgr ...
Starting hybrid sysmgr ...
done
Netbroker support IS present in the kernel.
done
Executing Prune clis.
Aug 24 09:31:14 %FW_APP-2-FIRMWARE_IMAGE_LOAD_SUCCESS No Firmware needed for Non SR card.
2020 Aug 24 09:31:28  %$ VDC-1 %$  %USER-2-SYSTEM_MSG: <<%USBHSD-2-MOUNT>> logflash: online  - usbhsd
2020 Aug 24 09:31:35  %$ VDC-1 %$  %DAEMON-2-SYSTEM_MSG: <<%ASCII-CFG-2-CONF_CONTROL>> Poap replay /bootflash/poap_replay01.cfg - ascii-cfg[31425]
2020 Aug 24 09:31:53  %$ VDC-1 %$ netstack: Registration with cli server complete
System is coming up ... Please wait ...
....System is coming up ... Please wait ...
2020 Aug 24 09:32:46  %$ VDC-1 %$ %USER-2-SYSTEM_MSG: ssnmgr_app_init called on ssnmgr up - aclmgr
....2020 Aug 24 09:33:06  %$ VDC-1 %$ %USER-0-SYSTEM_MSG: end of default policer - copp
2020 Aug 24 09:33:06  %$ VDC-1 %$ %COPP-2-COPP_NO_POLICY: Control-plane is unprotected.
System is coming up ... Please wait ...
2020 Aug 24 09:33:15  %$ VDC-1 %$ %CARDCLIENT-2-FPGA_BOOT_GOLDEN: IOFPGA booted from Golden
2020 Aug 24 09:33:15  %$ VDC-1 %$ %CARDCLIENT-2-FPGA_BOOT_STATUS: Unable to retrieve MIFPGA boot status
....System is coming up ... Please wait ...
.2020 Aug 24 09:33:47  %$ VDC-1 %$ %ASCII-CFG-2-CONFIG_REPLAY_STATUS: Bootstrap Replay Started.
.2020 Aug 24 09:33:51  %$ VDC-1 %$ %VDC_MGR-2-VDC_ONLINE: vdc 1 has come online
Waiting for box online to replay poap config
2020 Aug 24 09:34:09 switch %$ VDC-1 %$ %ASCII-CFG-2-CONFIG_REPLAY_STATUS: Bootstrap Replay Done.
2020 Aug 24 09:34:31 switch %$ VDC-1 %$ %USER-1-SYSTEM_MSG: SWINIT failed. devid:241 inst:0  - t2usd
2020 Aug 24 09:35:46 switch %$ VDC-1 %$ %ASCII-CFG-2-CONFIG_REPLAY_STATUS: Ascii Replay Started.
2020 Aug 24 09:36:19 switch %$ VDC-1 %$ %ASCII-CFG-2-CONFIG_REPLAY_STATUS: Ascii Replay Done.
2020 Aug 24 09:36:21 switch %$ VDC-1 %$ %ASCII-CFG-2-CONF_CONTROL: System ready
[########################################] 100%
2020 Aug 24 09:36:52 switch %$ VDC-1 %$ %VMAN-2-ACTIVATION_STATE: Successfully activated virtual service 'guestshell+'
2020 Aug 24 09:36:52 switch %$ VDC-1 %$ %VMAN-2-GUESTSHELL_ENABLED: The guest shell has been enabled. The command 'guestshell' may be used to access it, 'guestshell destroy' to remove it.
Copy complete, now saving to disk (please wait)...
Copy complete.
Auto provisioning complete


User Access Verification
switch login:
ANSIBLE
Your switch is UP with the target image and your configuration. Now you are able to continue your setup with ansible.
For ansible we have install the latest version with python-pip :
If you want to test the automation with Cisco ACI, you can use the following container.
docker pull zednetwork/aci-dev:latest

root@docker1:~/aci-dev# docker images zednetwork/aci-dev
REPOSITORY           TAG                 IMAGE ID            CREATED             SIZE
zednetwork/aci-dev   latest              b1c09a7c66f0        About an hour ago   1.31GB
I preinstalled Ansible 2.9.11, the ACI SDK (COBRA) in version 4.2(4) and ARYA.
You can run directly the container with the command: